TIPS & TRICKS
space planning
Room AMPLITUDE
Tangible Aspects
UNDERSTANDING GENUINE LEATHER HIDES
If you are considering re-upholstering any furniture items in natural leather, there are a few things to take into consideration when choosing your hide. In this piece I will highlight the items that I find key, but this is not an exhaustive list. A few key items to consider are the grain finish and dying method. We will explore these below. As always, consult a trusted leather merchant for more detail and guidance if necessary. African Leather & Skins are my go to partner for all my hide requirements.
GRAINS
There are two primary types of grains to consider when making your selection, the full grain or corrected grain hide.
A Full Grain hide is identifiable by the fact that it retains much of its “raw” characteristics. It has not been overly processed and often just the hair/hair layers are removed before dying which leave behind many of the natural markings of the animal. These include scratch marks, wound scars, tick bite marks and even branding marks. These marks add a natural organic feel to the hides and finished product. This does not mean that the hide will always be covered in them, it is possible by means of personally inspecting and selecting your hides to select hides with fewer or more of these natural markings to your liking. A good upholsterer will be able to work around these marks when cutting the hide.
A Corrected Grain hide refers to the product where the hide has had much of the other layers buffed or sanded out or split to obtain a smooth, even textured surface. This surface is then prepared and the desired grain finish is pressed or stamped into the hide to give an even texture/grain pattern across the entire hide surface without any natural markings.

FULL GRAIN LEATHER

FULL GRAIN WITH SCARS

CORRECTED GRAIN HIDE
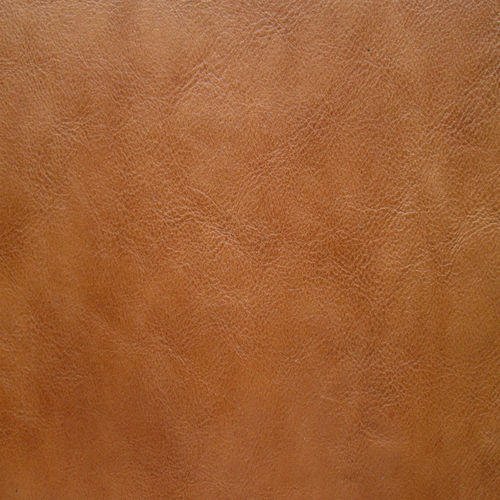
ANILINE TAN

SEMI ANILINE RED

ANILINE PULL UP
DYING
The terms Aniline or Semi-Aniline refer to the dying technique. The hides are dyed in a drum with aniline dyes. Aniline dye is a translucent, water-soluble synthetic dye without any insoluble pigments. During the dyeing process, the natural grain including all the markings, scars and wrinkles are brought out in each hide.
In contrast, semi-aniline dye contains a small amount of pigment, which allows the leather to still display its natural characteristics while bringing more colour consistency.
The third type is the pull-up aniline leather, which has a coating of oil or wax to give it a distressed look. This finish works great on deep botton upholstery as the colour variation on the folds gives it a look of some antiquity.
Off course there are a host of colours and hide origins available to suit every purpose and application. feel free to contact us for a consultation or visit your trusted leather merchant.
We hope that you find this article helpful when it comes to choosing hides for your next project.
DECORATE THE PERFECT BOOK SHELF
Have you ever looked at your book case crammed to capacity with books filling every available opening or slot in the book case and wondered how you can redecorate the shelves to be more inviting and updated - I’ve put together these tips to help you out.

STEP 1: Edit
I know that it has been a life’s work collecting the hundred of books that you have on the shelves, and that you have read all of them, and some of them you’ve even read several times, but some of them you haven’t pulled out of the shelf for years. work through them and store what you feel you may need to access again some time and donate those that you are sure you will never need again.
Keep those that you love, use often or maybe just have some sort of attachment to.
Step 2: Decor style and colour
Decide what colour pallet a style you want to work towards. Items that work great when decorating a book shelf and are my staples are:
Your books obviously
Boxes and baskets
Decorative objects
Picture frames or artworks
Botanicals
Vases and vessels
Bowls
If you collect things, like bird cages, tea cup trios or anything like that - this is a great place to display them.


Step 3: Decide your strategy
There are a few general techniques or rules of thumb that you can work with. Some people prefer to use only one and others my mix and match to get the result they feel most comfortable with.
Triangles - Arrange collections of items in groupings that form a triangle with a high point and low point. I prefer to group in uneven numbers (three’s and five’s) but with limited shelf space like a book shelf it is probably best to keep to three’s.
Thirds - Divide the shelves into three vertical columns and work in the “slots” not repeating a pattern in adjacent slots.
Step 4: Decorate
Start by placing the books first - these are really the primary purpose of the book case, and may take up the most space. You are doing something creative here, so move away from stacking the books upright in a row next to each other. Play around with different stacking styles. Do some up right, some on their side, or even combinations of both. Be mindful of balance at this stage - spread your books out across the entire book case (remembering what strategy you decided to go with in point 3) and leave space for all the other items that you have gather to use on the shelves.
Then go to layering in things like picture frames and artwork. things with larger face surfaces. Remember that layering is the key term here. Things shouldn’t be placed side by side in a row. Frames partially behind books or visa versa. Some at the back and others to the side. Add vases, vessels and other larger decorative items next.
Then we bring in the smaller decorative objects, again layering them in and grouping them. Add florals, beads or any other items to round off your shelves.
So those are the basics - go tackle that bookshelf project that you’ve been wanting to and see how it goes. Please feel free to contact me for advise or suggestions or share your work with me via mail - chris@christopherdebod.com.
Chris


The perfect picture wall


A collection of photos, artwork or curios from your travels around the country or world can add a great point of interest to a room. The trick is ensure that whatever you decide to hang on a wall is is proportionate to the space available.
Great impact is achieved by grouping many smaller sized frames, of various styles, but a limited colour range to create a large group in a specific shape or pattern.
The diagram illustrates a few “go-to” cluster patterns that you could use to create your perfect picture wall.
Gallery shelves are a great idea if you get board easily or like to change your art or frames often.
CARING FOR YOUR CURTAINS

I often get questions from friends, family and clients asking what the best way is to wash curtains, quickly followed by the question about how to dry them.
My first piece of advise is professional cleaning is the way to go. Curtains are big and heavy when they are wet, with most standard washing lines not being large enough to hang them out to dry. There are professional curtain care services that will remove your curtains, clean them and hang them for you again.
If you prefer to wash them yourself, please carefully follow the recommended cleaning instructions. If your curtains are machine washable, wash them on a suitable cycle and temperature with a mild detergent and a little fabric softener. Do not spin too much as this may result in creases that you will not be able to get out.
Once washed, hang them back on the rail while they are wet. This will allow them to dry while spread out and hanging to give you the best results.
HOW MUCH FABRIC FOR UPHOLSTERY?
I often find that when a person decides to take on an upholstery project themselves, ones doesn’t always know how many meters of fabric you would need to complete your project, causing you to either under or over buy.
The other scenario that I encounter often is that when one takes your item to an upholsterer, they often quote on too much fabric.
This table is a guide to the approximate amount of fabric you would need for typical types of upholstered furniture items. There are certain nuances that may need to be considered, and without going into the technicalities, which way does the pattern run on the fabric, or what is the pattern repeat measurement, but this chart will give you a good idea non the less.
Hope this helps.

Proud and active member of: